
HTML File
The HTML file contains references to the files and the background image. It also contains variable definitions that will be discussed below. A typical HTML file would look like the following:
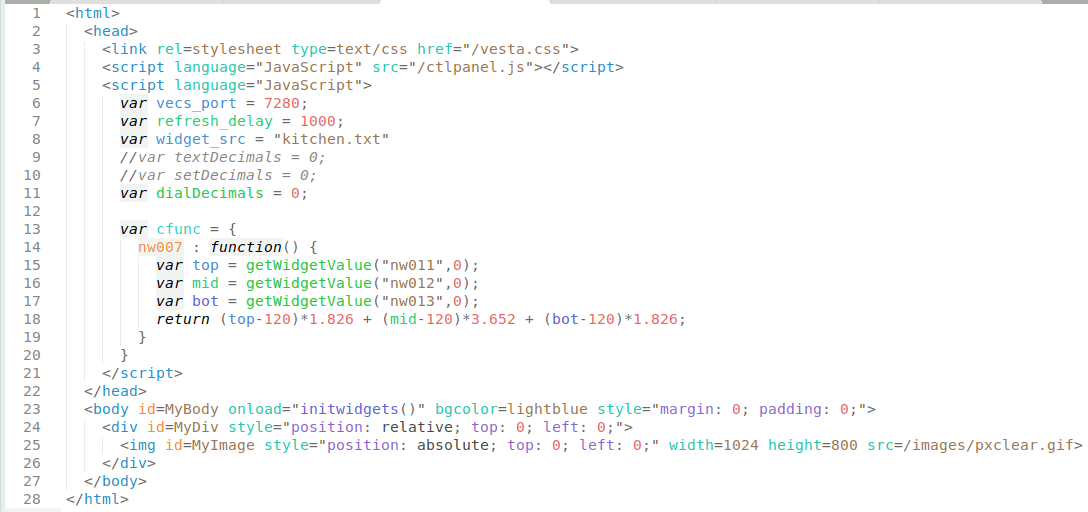
Figure 4: HTML File for custom page
This is one of two files that MUST be edited by the user, either directly or using Edit Mode, to create a user interface. If it's hosted on Vesta, then it should be in either the public or private directories (/var/www/public/ and /var/www/public/ respectively). We'll go through it line by line.
Lines 1 through 5 contain references to CSS and Javascript source files. Don't change these lines.
Line 6 contains the TCP port number for communication with Vesta. It should be 7280 unless you have changed the Vesta's default behavior.
Line 7 specifies the delay between updates of the widgets in the interface. The delay is in milliseconds, so a value of 1000 means that all the widgets will update once every second. If you have a lot of widgets (50 or more) specifying too small a delay can overload the Vesta controller. This can cause delayed rule execution. A good rule of thumb is to take the number of widgets and multiply by 5 to get the minimum delay in milliseconds. For a display with 50 widgets like the example above, the delay should be about 50 * 5, or 250 milliseconds. With this delay on the standard CPU, a single display instance on a single browser will use about 4% of CPU capacity. This allows several instances (iPad, Smart Phone, Computer in den) to be updated simultaneously without affecting system performance. At total rates above 1000 widget updates per second, system performance may start to be affected.
NOTE: If you are running an older version of the system software (earlier than 2.0.1451), then you need to use much longer delays. Multiply the number of widgets by 50 rather than 5 to get the minimum delay. With the older software, a 50-widget display should have a delay of at least 2500 milliseconds.
Line 8 specifies the widget configuration file - in this case, "kitchen.txt". This file contains a list of widgets to be displayed. In addition to the HTML file, this file must be created by the user. Note that this file must be in the same directory as the .html file, and that the full path must not be included in the file name (/public/kitchen.txt would not be valid, for instance).
Lines 9 through 11 specify the number of decimal places for 'text', 'set', and 'dial' widgets respectively. The default if not specified is 1 decimal place. the double slash // in lines 9 and 10 turns the line into a comment that's ignored by the system, so text and set widgets will display 1 decimal place in this example.
Note that these settings affect all widgets of a given type. There's no way to have some dials display 1 decimal place and others display 2, for instance.
Lines 13 through 20 contain code for a custom function. This feature will be described below.
Line 25 contains the background image - in this case, "/images/pxclear.gif". This line is required, and must specify a valid image. The size of the image defines the area available for display widgets. The image can reside anywhere as long as the browser can access and display it. The Vesta is distributed with a single pixel transparent image that can be used as in this case. instead. If using the transparent pixel image, the width and height must be specified as shown.
Custom Functions
In some cases it may be useful to display a value that's calculated from other values. The Vesta custom GUI supports this through the creation of 'custom functions'. A custom function is associated with a specic widget, and is written using JavaScript. In the example above there's a widget that displays total heat available in a storage tank. That heat is calculated from the temperatures at the top, middle, and bottom of the tank. There are four widgets involved:
- nw007: the widget that will display the total heat available
- nw011: a widget displaying the tank top temperature
- nw012: a widget displaying the tank middle temperature
- nw013: a widget displaying the tank bottom temperature
Widget IDs can be obtained by right-clicking on the widget in edit mode. Note that adding or deleting widgets may change the ids.
A custom function is defined for widget nw007 in lines 13-20 above.
Line 13 begins custom function declarations. Do not edit this line.
Line 14 begins the custom function for widget nw007. If custom functions are defined for other widgets, they would begin after the nw007 function (after line 19).
Lines 15-17 use the getWidgetValue() function to read the value of widgets nw011 through nw013. The second parameter is required and is the default value to be used if the widget can't be read.
Lines 18 performs the necessary calculation to convert temperatures to BTUs. Note that custom functions can perform any calculation on any data that's available to JavaScript, as long as it returns a numeric value.